Magento 2 Wholesale and Manufacturer Discount extension configuration

Magento 2 Wholesale and Manufacturer Discount User Guide

Create a dedicated B2B storefront, register and approve wholesale customers, control catalog access, and offer customer-group, tier, website, or manufacturer-based pricing.

Who This Guide Is For

This guide is for Magento store owners and administrators who operate separate retail and wholesale channels for dealers, distributors, resellers, or other B2B customers.

Features of the Wholesale Extension

  • Dedicated B2B Storefront: Create or repair a separate wholesale website, store group, and active store view.
  • Wholesale Registration: Send B2B visitors to a dedicated registration form and assign the configured wholesale customer group.
  • Controlled Access: Prevent retail customers from signing in to a configured wholesale website.
  • Customer Approval: Require administrator approval before selected customer groups can sign in.
  • Catalog Visibility: Assign products and categories to the B2B website and restrict guest catalog access where required.
  • Group and Tier Pricing: Use Magento customer-group and quantity-tier prices without duplicating products.
  • Website Pricing: Configure website-scoped prices when retail and wholesale websites require different base prices.
  • Manufacturer Discounts: Apply manufacturer-specific discounts where this optional pricing feature is used.
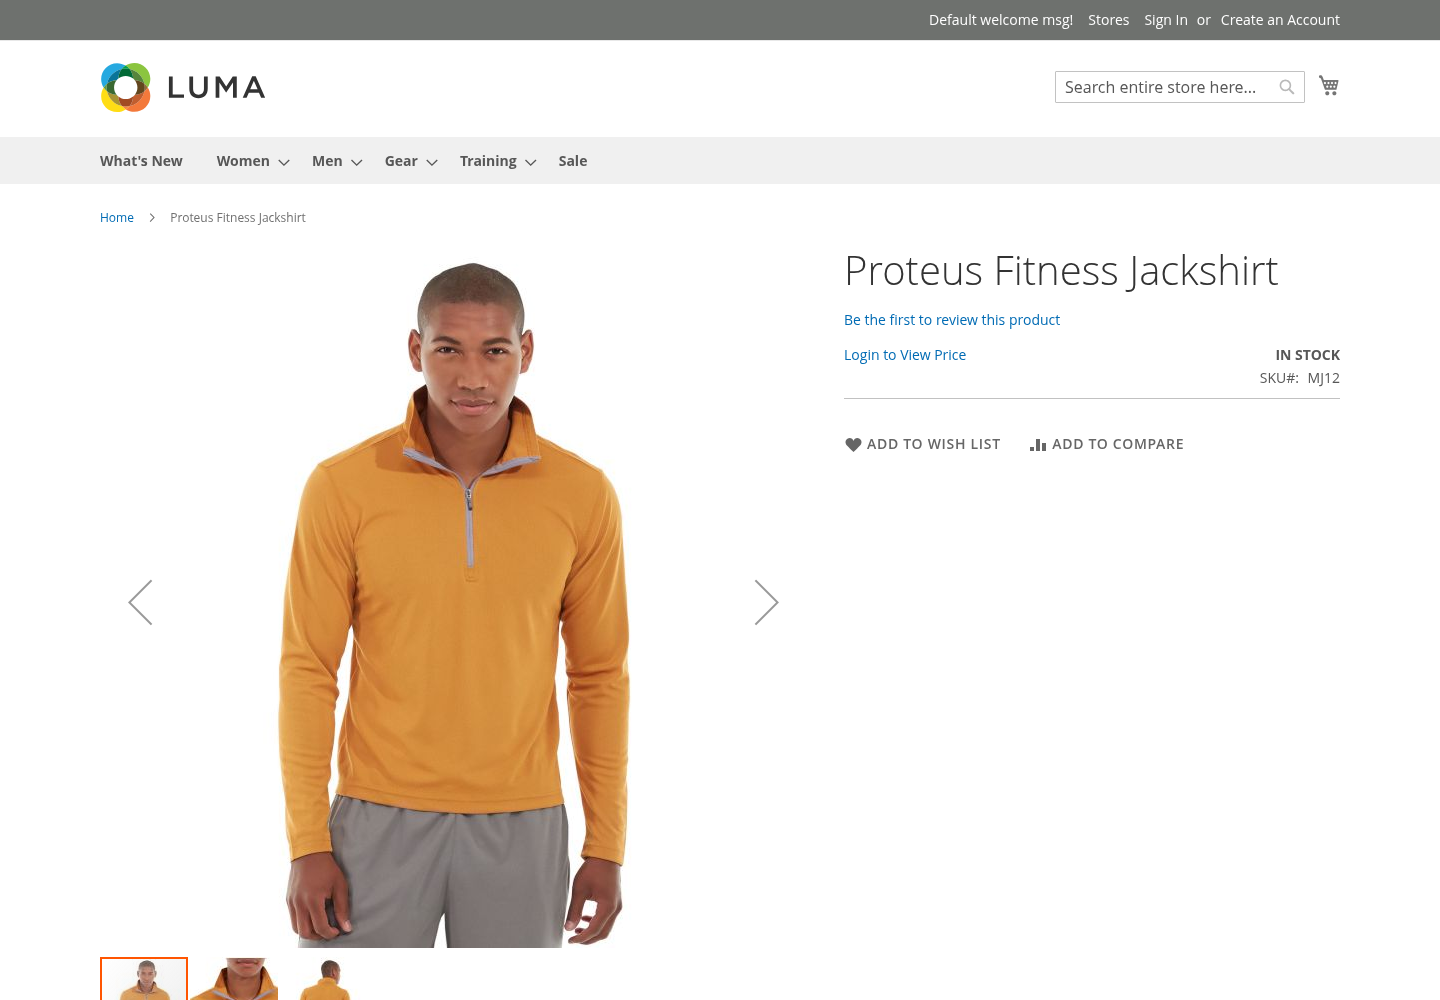
  • Hide Price: Replace prices with configurable text or a link for selected customer groups.
  • Magento 2.4.8 Support: Uses the current Magento registration, session, website, and customer-group lifecycle.

HOW TO INSTALL VIA SSH.

  • Step 1.

    Before starting the installation:

    • Ensure your Magento version is compatible - Please check the current compatible versions on its product page.
    • Install the extension on a testing/development/staging environment first, then, after thoroughly testing it out, install it on a production (live) environment.
    • Make sure the Magento instance is in developer mode. You can use the php bin/magento deploy:mode:set developer command to change the mode to developer and then check to make sure the generated folder in the root of the Magento project is empty.
  • Step 2.
    Copy the extension files to below paths of your magento 2 instance. If ‘app/code/Acx’ folder is missing, please create it manually:
    app/code/Acx/Backend
    app/code/Acx/Webpos
  • Step 3.
    Access the root of your magento 2 project from command line and run the following commands:
    composer require mpdf/mpdf
    php bin/magento module:enable Acx_Backend Acx_Purchase Acx_PurchasePro Acx_Pdf Acx_PdfPurchase Acx_Supplier
    /* (example extension; this may differ for other modules) */
    php bin/magento setup:upgrade
    rm -rf var/di generated/*
    php bin/magento setup:di:compile
    rm -rf pub/static/*/*; rm -rf var/*/*
    php bin/magento setup:static-content:deploy -f
    php bin/magento cache:flush
  • Step 4.
    Flush any cache that you might still have enabled on your server or in Magento.
  • Step 5:
    If your store was in production mode before starting the installation, make sure to switch it back to production mode by running the following command in the root of your Magento installation: php bin/magento deploy:mode:set production.
  • Step 6:
    The extension is now installed on your Magento store! Congratulations!

Wholesale Extension Configuration

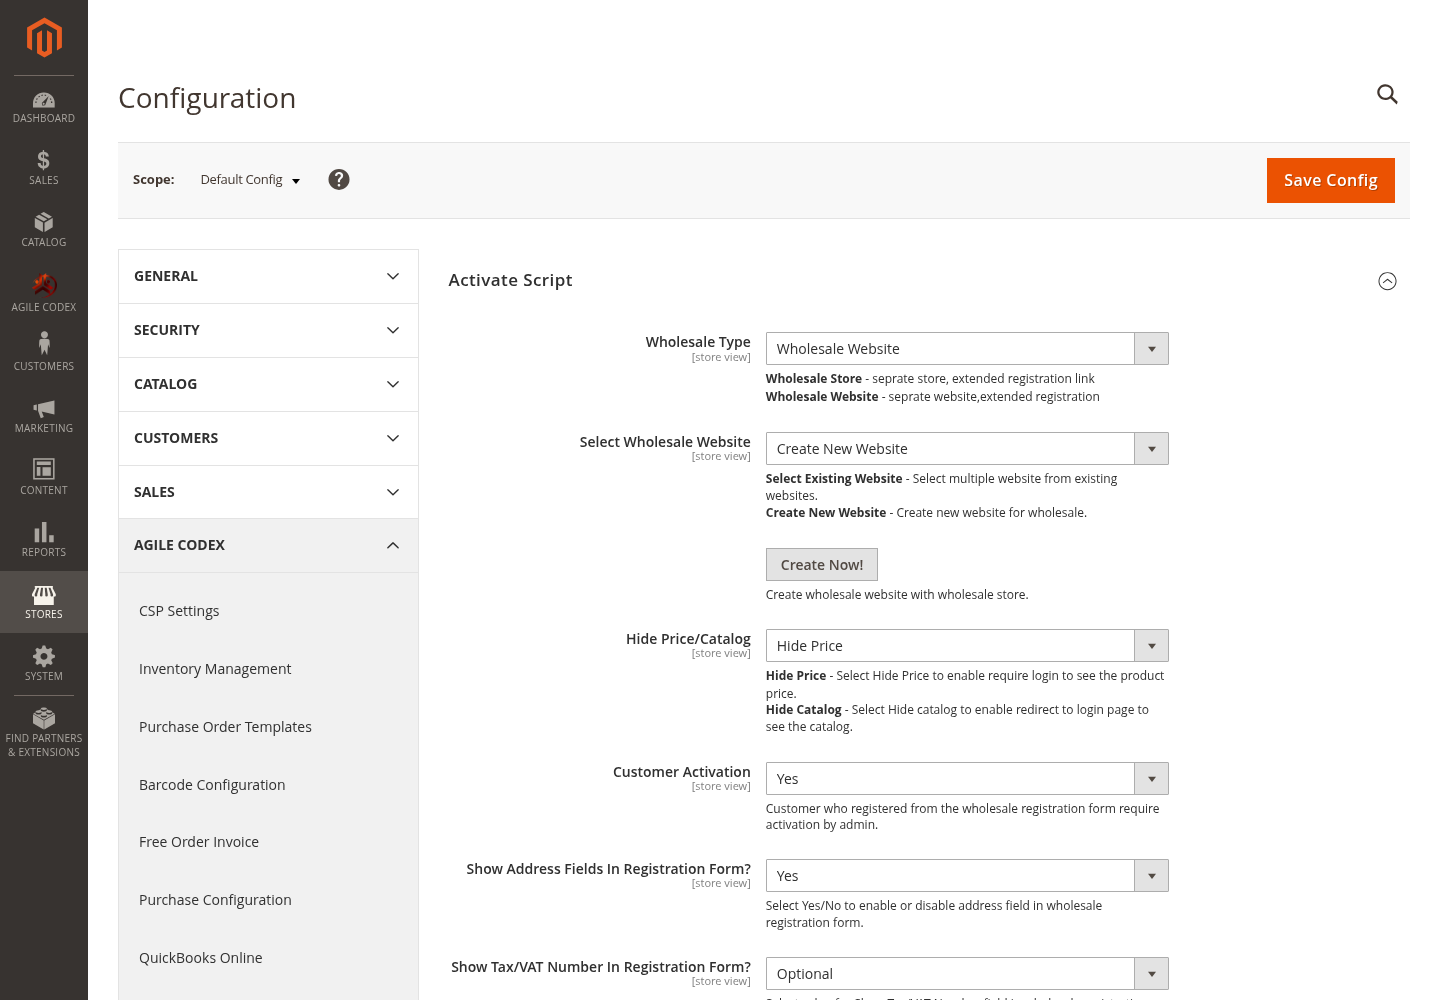
From Magento Admin, go to Stores > Configuration > Agile Codex > Wholesale Settings.
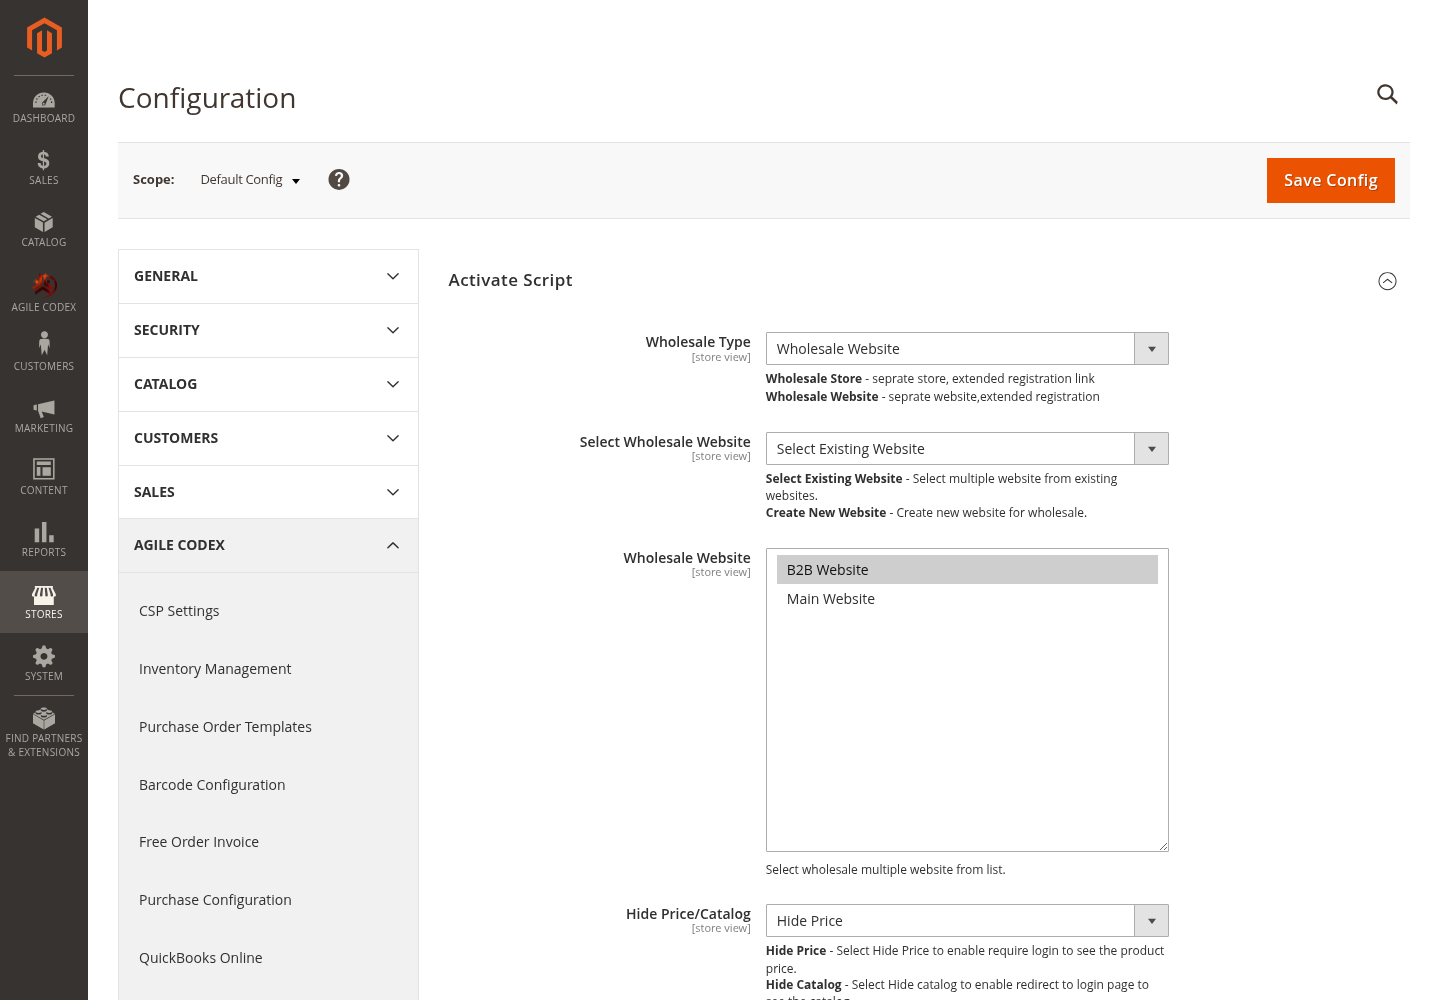
Magento Admin wholesale settings navigation

Choose the Wholesale Mode

Select Wholesale Website when B2B customers use a dedicated website. Select the store-based option only when wholesale behavior must be limited to selected store views within an existing website.

Select wholesale website mode and configuration

General Settings

  • Wholesale Website: Select each website that should use wholesale registration and login restrictions.
  • Create Now: Provision the configured B2B website or repair a missing store group and store view.
  • Wholesale Store: Select store views when using store-based wholesale mode.
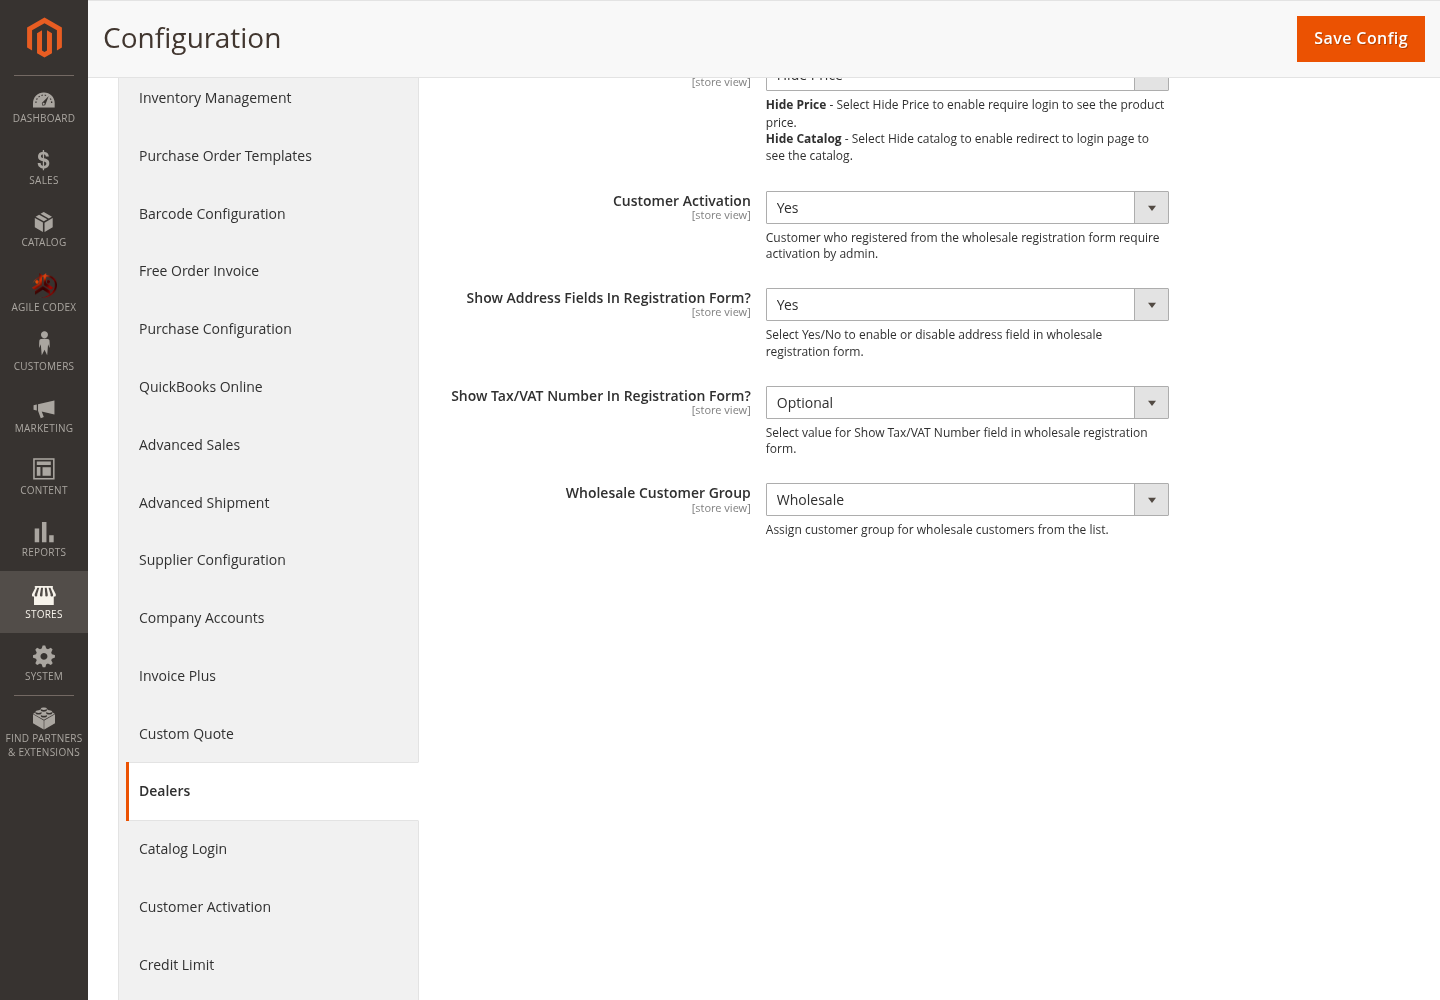
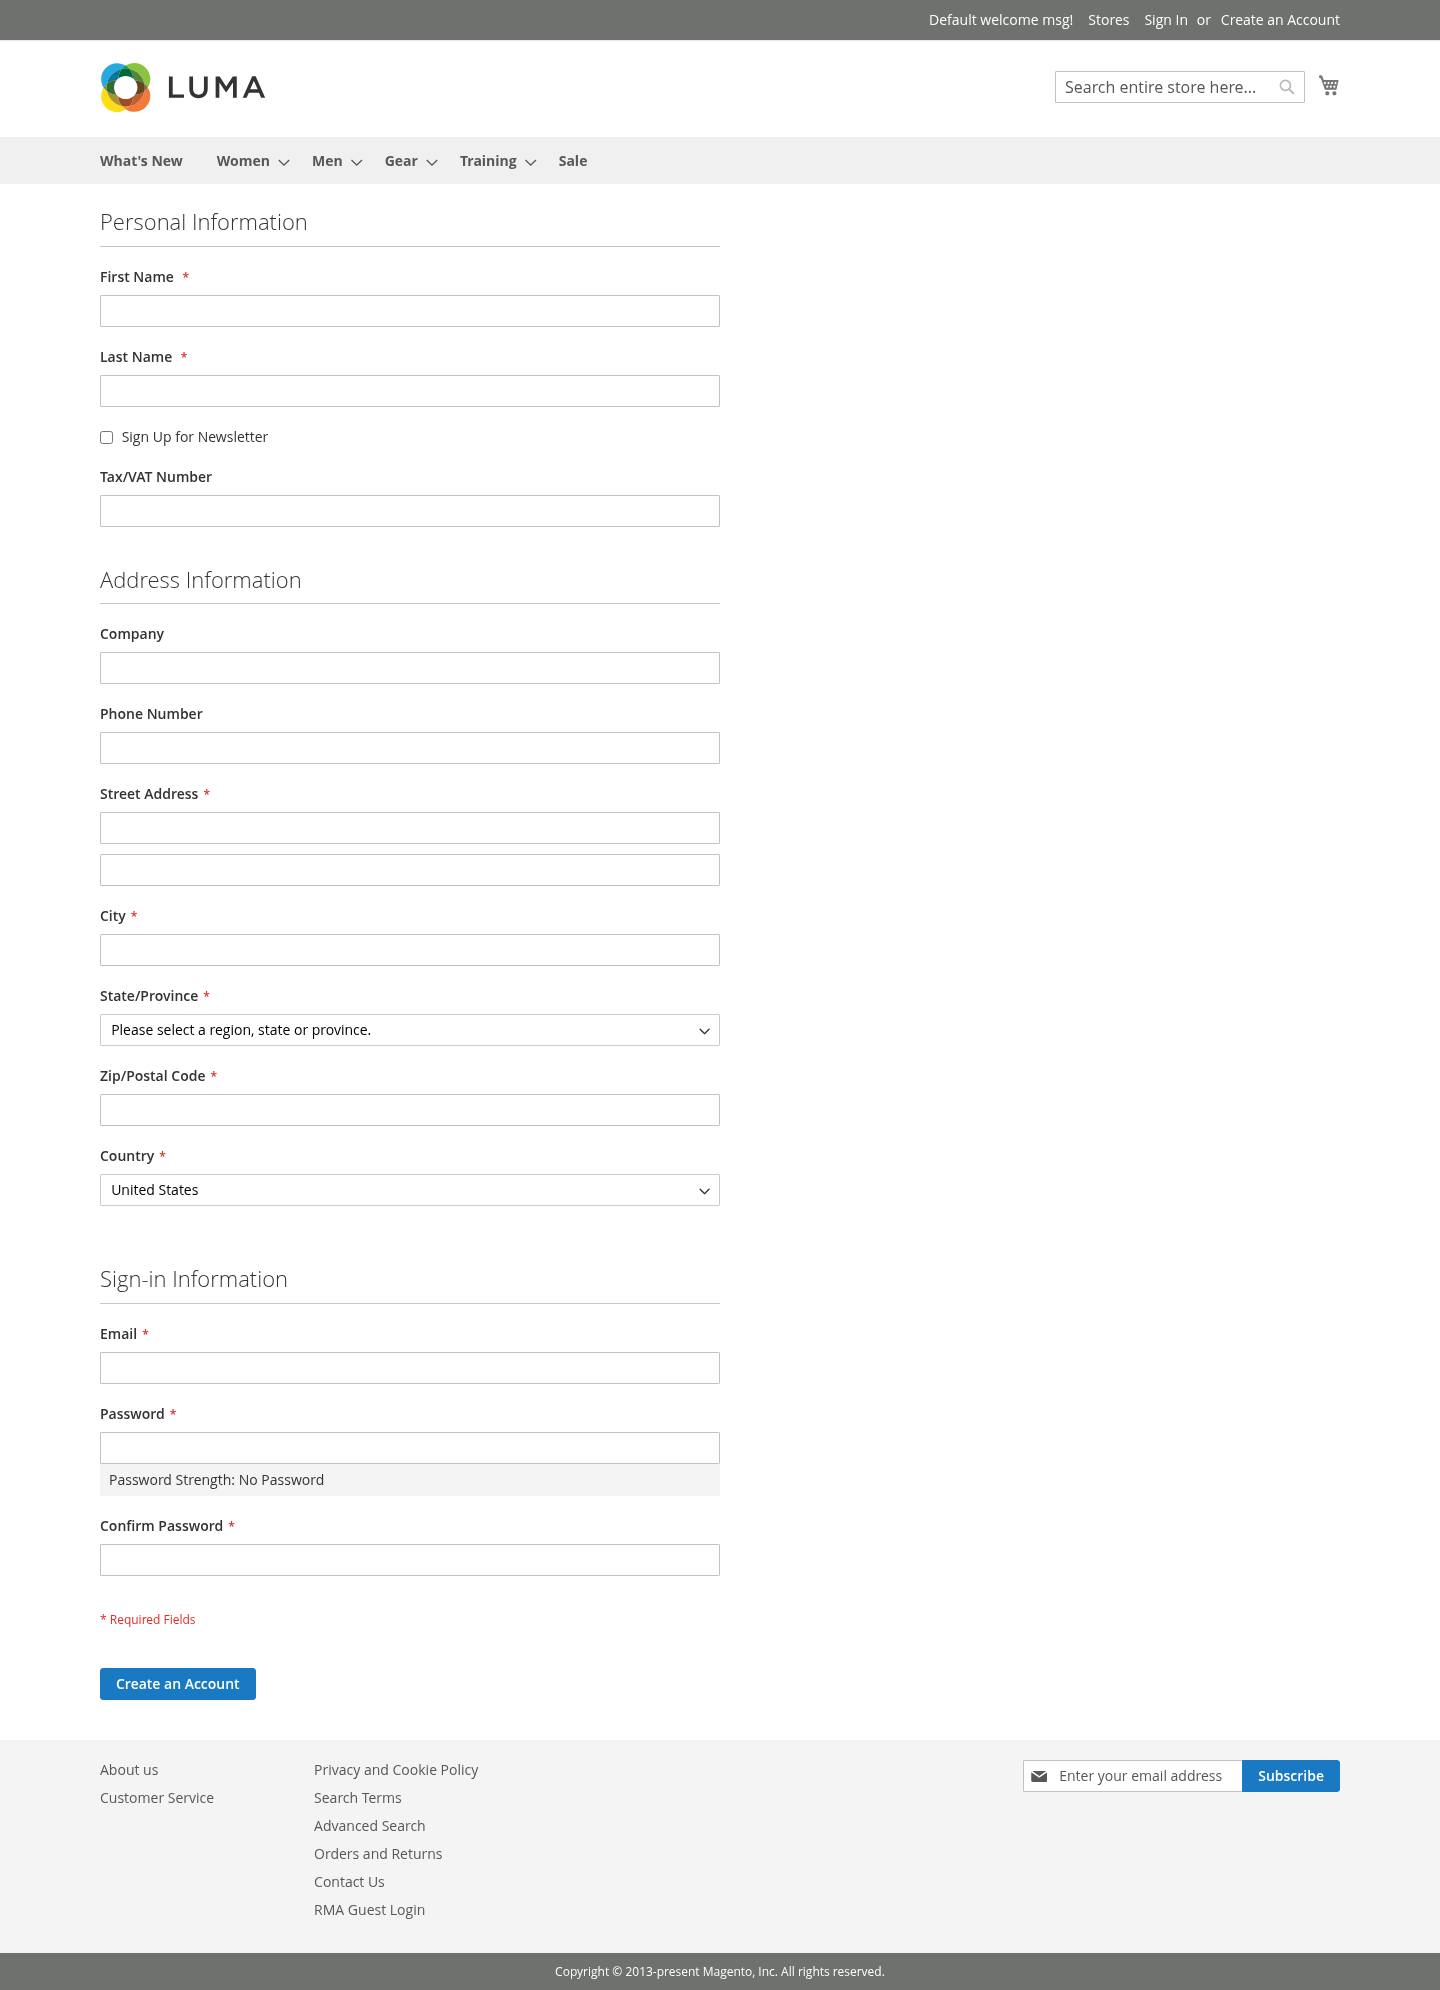
  • Show Address Fields: Include company, telephone, street, city, region, postcode, and country during registration.
  • Show Tax/VAT Number: Display the Tax/VAT field on the wholesale registration form.
  • Wholesale Customer Group: Choose the group assigned to customers who register on a wholesale website.
  • Customer Activation: Require approval for newly registered wholesale accounts when the activation module is enabled.
  • Hide Price/Catalog: Apply the configured guest or customer-group visibility policy at website scope.

Create the Magento 2 B2B Website

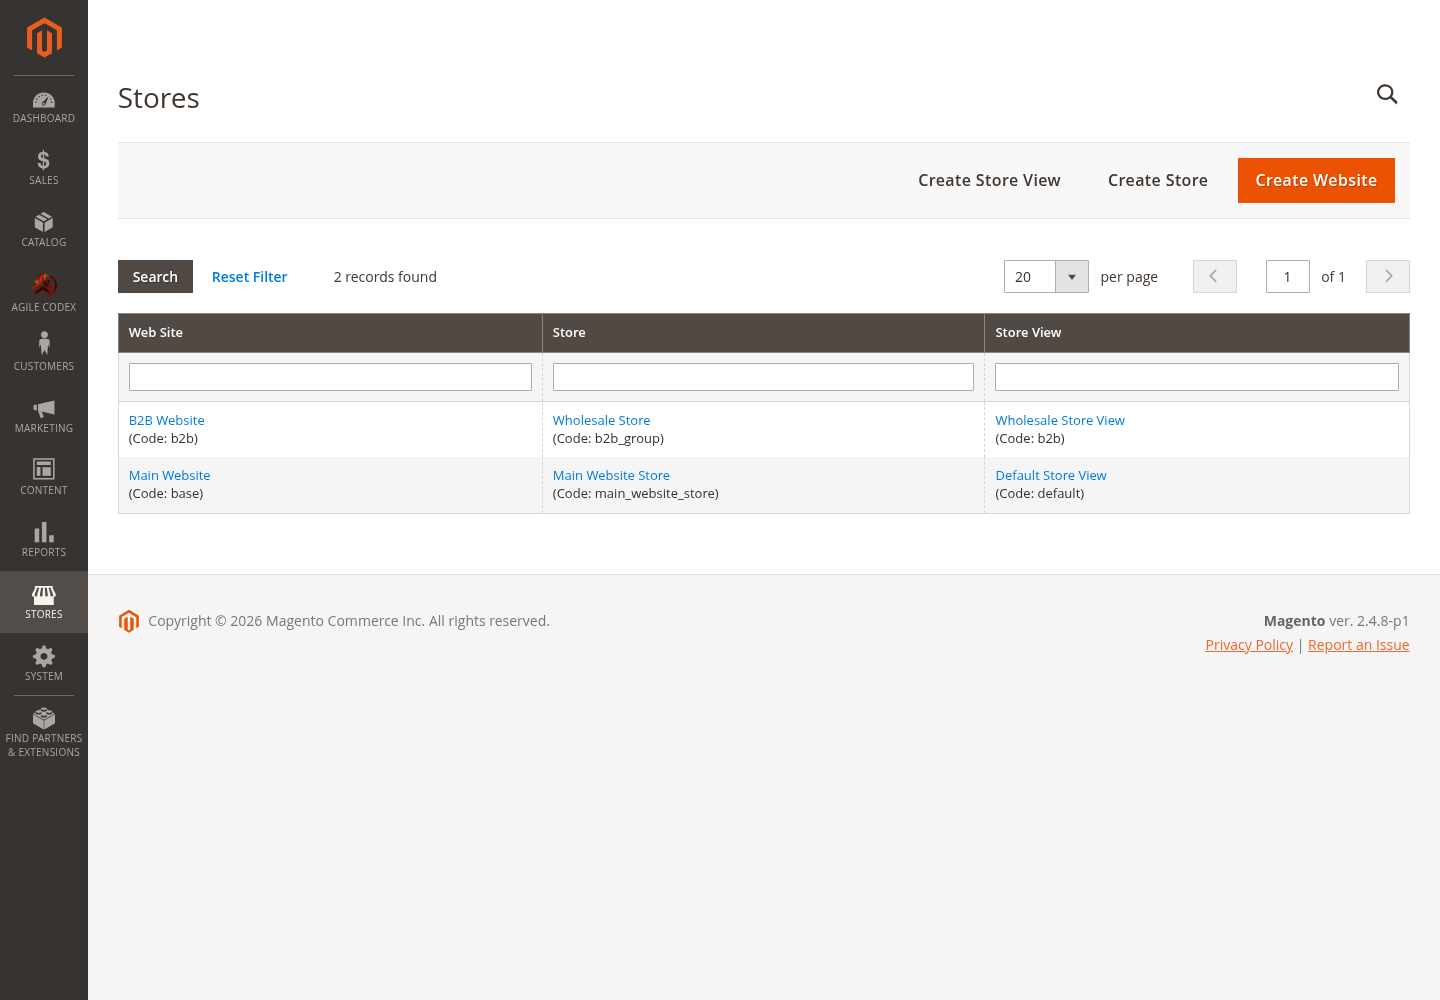
After saving the wholesale settings, click Create Now. The action is idempotent: it can complete a partially created website by adding the missing store group or active store view.

Confirm the result under Stores > All Stores.

Magento B2B website store group and store view

Configure the B2B Frontend URL

Set valid secure and unsecure base URLs for the new website. With a path-based setup, the storefront can use a URL such as https://example.com/b2b/. Confirm that the website has a default store group, the group has a root category, and the store view is enabled.

Assign Products and Categories to the Wholesale Website

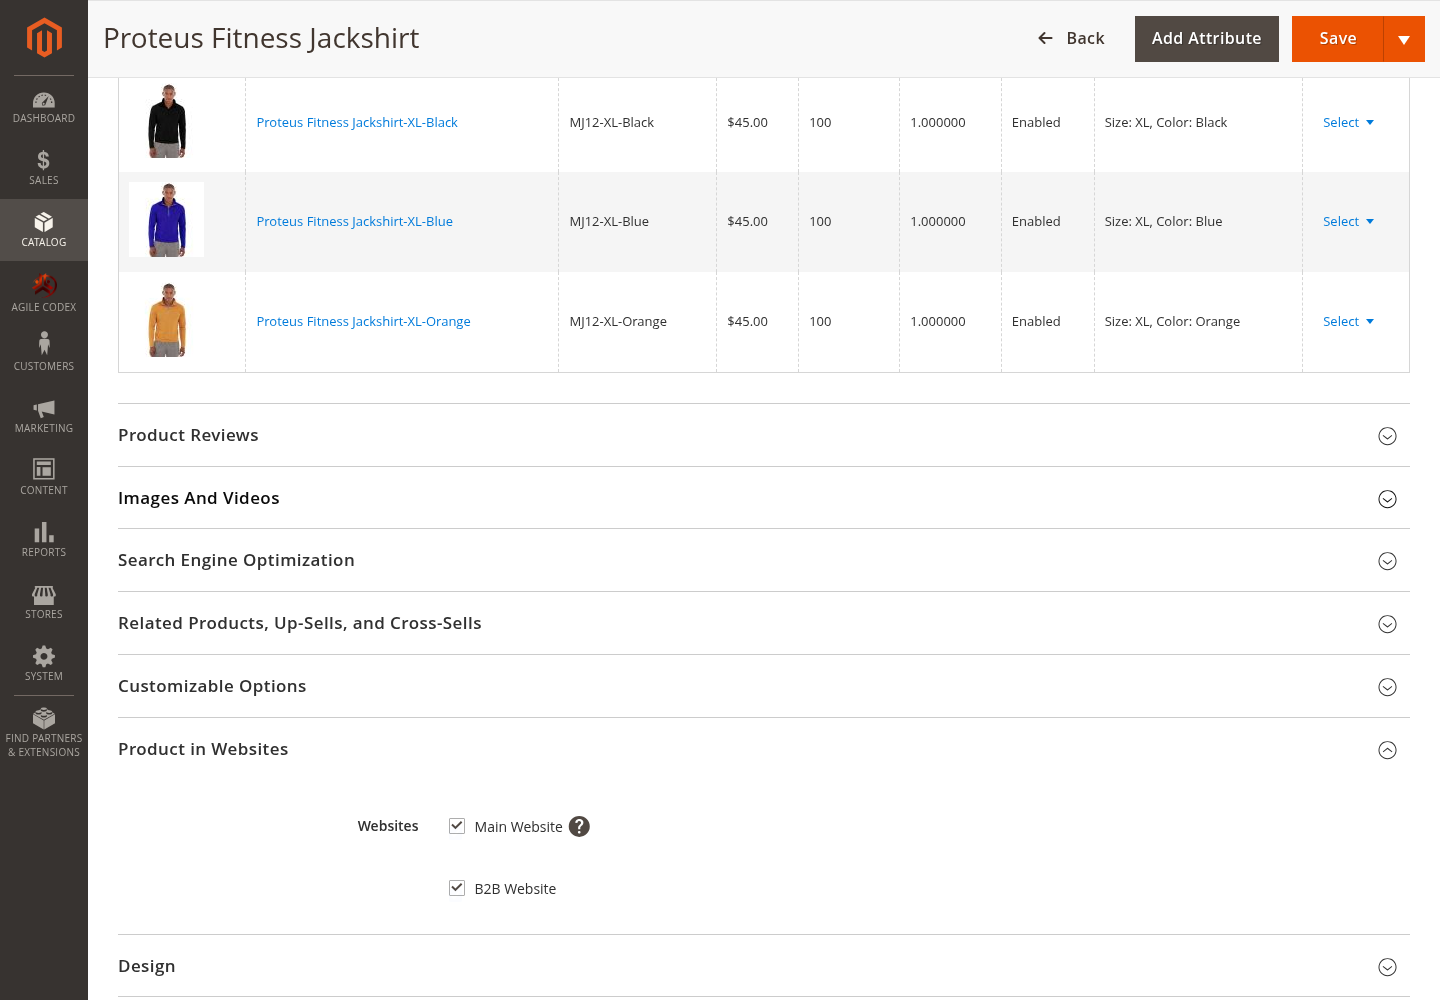
  1. Open a product in Catalog > Products.
  2. In Product in Websites, select both the retail and B2B websites when the same product is sold in both channels.
  3. Save the product and reindex Magento.
  4. Ensure the B2B store group uses a root category containing the intended categories and products.

You normally do not need duplicate wholesale products. Use website assignment, customer-group prices, or tier prices on the original product. Create a separate product only when content, inventory, visibility, or another business rule must be independently managed.

Configure Wholesale and Tier Prices

Customer-Group and Quantity Pricing

  1. Go to Catalog > Products and edit the product.
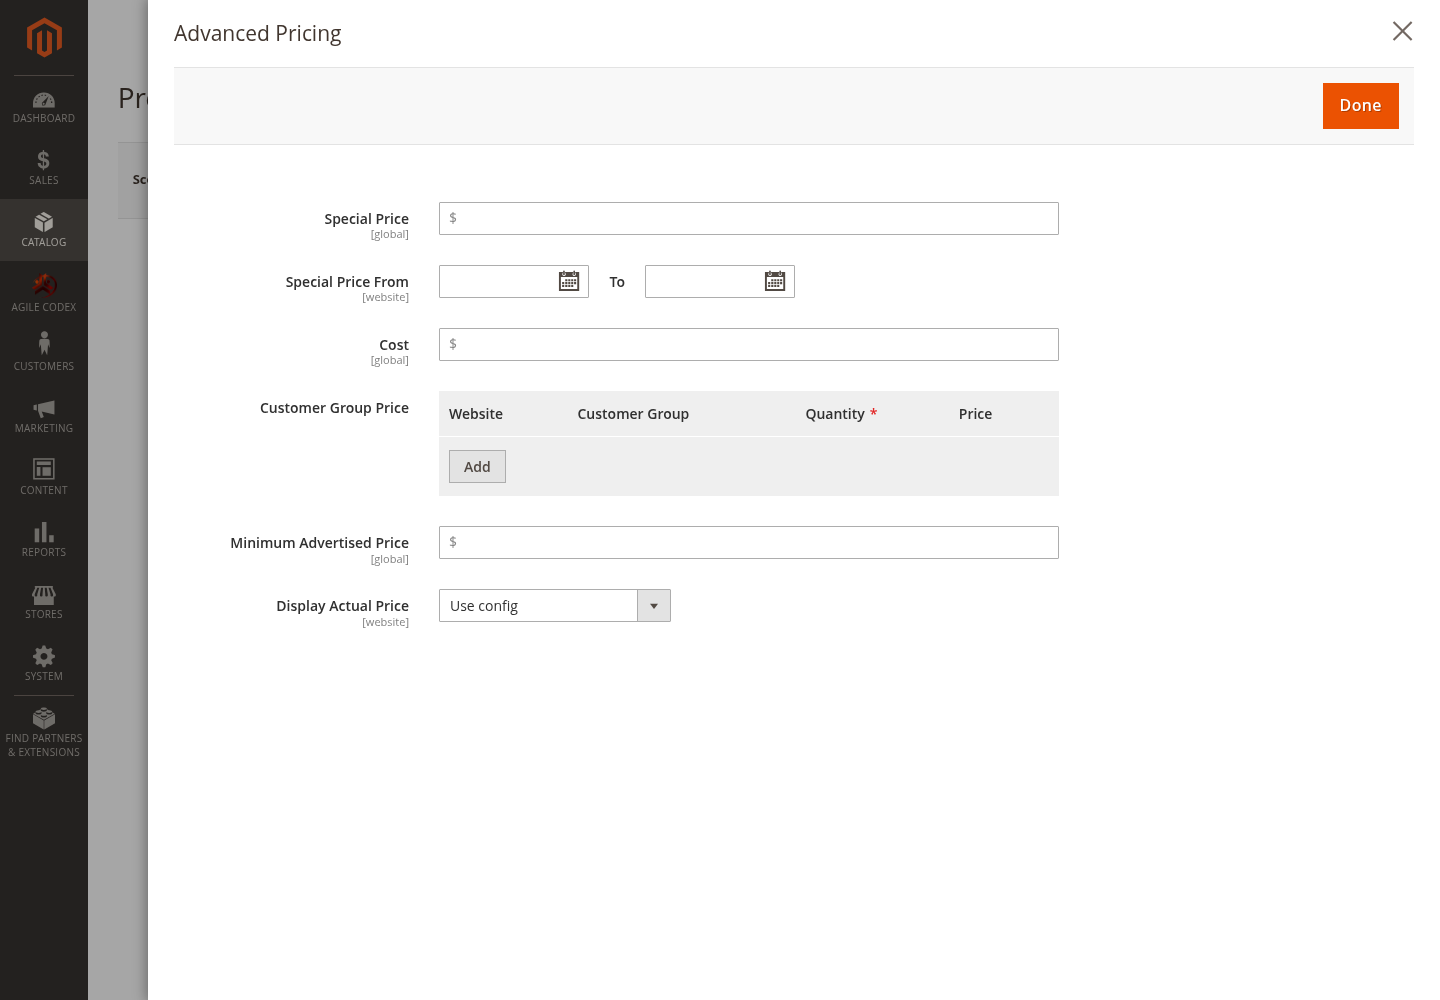
  2. Open Advanced Pricing.
  3. Add a customer-group or tier price for the configured Wholesale group.
  4. Select the applicable website, enter the fixed price or discount, and set the minimum quantity for tier pricing.
  5. Save and reindex.

Website Price Scope

For different base prices per website, go to Stores > Configuration > Catalog > Catalog > Price and set Catalog Price Scope to Website. Then switch the product edit scope to the B2B website and enter its price.

Retail website product price in Magento 2 Wholesale website discounted product price in Magento 2

Configure Manufacturer Discounts

Go to Agile Codex > Manufacturer Discount > Manage Manufacturer Discount.

Magento 2 Manage Manufacturer Discount menu

The grid lists configured manufacturers and their discount values.

Magento 2 manufacturer discount list

Click Add New Manufacturer, select the manufacturer, enter the discount amount, and save. Confirm the product has the matching manufacturer attribute value before validating the frontend price.

Add a manufacturer discount in Magento 2

Wholesale Registration and Login Access

On a configured wholesale website, Magento redirects the standard customer registration URL to /wholesale/account/create/. Customers created through this form are assigned to the configured wholesale group.

Magento 2 wholesale customer registration form

Expected Login Behavior

  • Guest: Can access only the pages allowed by the catalog and hide-price configuration.
  • Retail customer: Cannot sign in to a configured wholesale website and is returned to login with an explanatory message.
  • Approved wholesale customer: Can sign in and access the B2B customer account and permitted catalog.
  • Unapproved wholesale customer: Remains signed out until an administrator approves the account.
Wholesale catalog redirects guests to Magento customer login

Customer Activation

Go to Stores > Configuration > Agile Codex > Customer Activation.

Magento 2 wholesale customer activation configuration
  • Enable: Enable or disable customer approval.
  • Activate New Accounts by Default: Choose the initial approval state.
  • Customer Group-wise Activation: Apply approval only to selected groups.
  • Require Activation for Group: Include the configured Wholesale group.
  • Notifications: Configure customer and administrator email templates and recipients.
  • Messages: Configure registration-success and pending-approval messages.

Approve or disapprove pending customers from the Magento customer management screen.

Approve a wholesale customer from Magento Admin

Hide Prices or Restrict the Wholesale Catalog

Hide Price by Customer Group

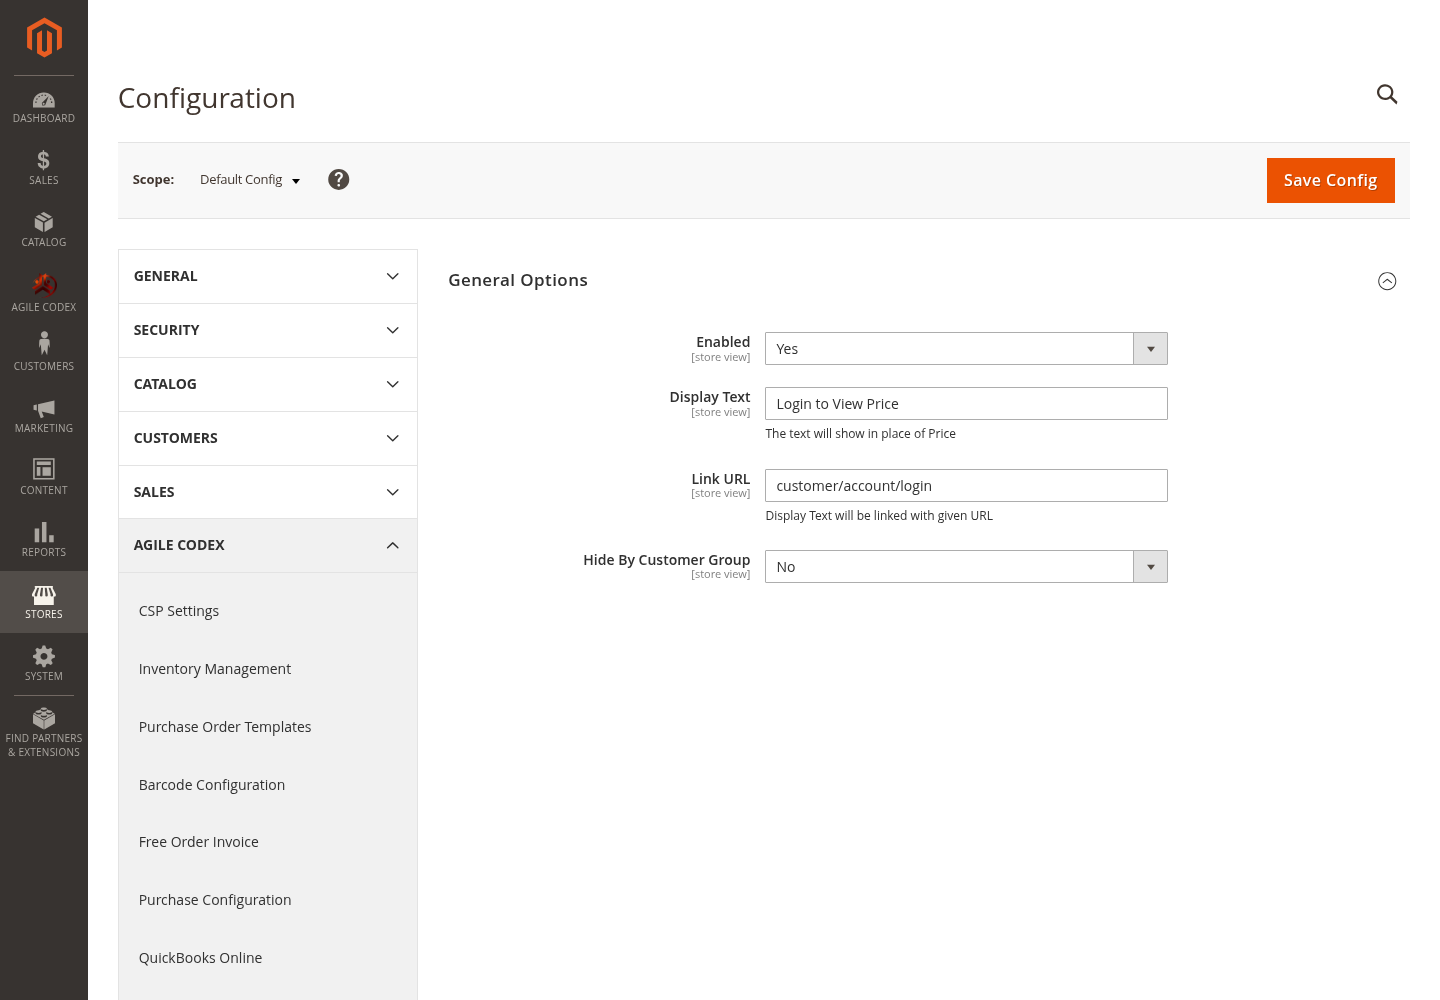
Go to Stores > Configuration > Agile Codex > Hide Price and configure:

  • Enabled: Enable price replacement.
  • Display Text: Enter text such as “Sign in to view price”.
  • Link URL: Link the replacement text to login, registration, or a contact page.
  • Customer Groups: Select the groups for which prices should be hidden.
Configure Magento 2 hide price by customer group

Restrict Catalog Access

Use the catalog-login configuration to control category navigation, product pages, category pages, and catalog search for guests.

Magento 2 wholesale catalog access configuration

Hide Price and catalog restriction are separate controls. Hiding a price does not automatically remove a product from navigation, and restricting a catalog does not configure wholesale prices.

Installation

Install and test the extension on a development or staging environment before production.

  1. Copy the supplied package modules into app/code/Acx.
  2. From the Magento root, enable the modules included in your purchased package.
  3. Run php bin/magento setup:upgrade.
  4. Run php bin/magento setup:di:compile in production mode.
  5. Deploy static content when required and run php bin/magento cache:flush.

A typical package can include Acx_Backend, Acx_Wholesale, Acx_Customeractivation, Acx_HidePrice, Acx_LoginCatalog, Acx_Manufacturer, and related catalog modules. Use the module list supplied with your package because licensed bundles can differ.

Troubleshooting

  • No products appear on B2B: Check product website assignment, the B2B root category, product status, visibility, stock, and indexes.
  • Guest can browse B2B: Verify the wholesale website selection and the catalog-login or hide-price settings at website scope.
  • Wholesale customer cannot sign in: Confirm the customer group, website/account-sharing scope, approval status, and password.
  • Retail price appears: Confirm the selected website scope and customer-group/tier-price row, then reindex prices.
  • Registration opens the wrong page: Confirm the configured website and use the canonical /wholesale/account/create/ route.
  • Create Now was already used: Run it again to repair missing B2B website components; it should not create duplicates.

PURCHASE MANAGEMENT

Purchase Order List

Access the Purchase Order List by navigating to Agile Codex >> Purchase Management >> click on Purchase Orders in the admin sidebar.

The Purchase Order List allows you to manage purchase orders efficiently from the backend. Here's an overview of the functionality:

Magento 2 Purchase Order Details

Purchase Order list displays the following columns:

  1. Supplier Name: The name of the supplier from whom the products are being purchased.
  2. Purchase Order Number: A unique identifier for the purchase order.
  3. Order Date: The date when the purchase order was created.
  4. Status: Shows the current status of the purchase order, such as "Pending," "Completed," or "Canceled."
  5. Total Quantity: Displays the total number of items ordered from the supplier.
  6. Total Cost: The total amount to be paid to the supplier for the order.
  7. Action: Options to view, edit, or delete the purchase order.

Purchase Order Form

The Purchase Order form allows administrators to create and manage purchase orders for suppliers. Below is a detailed description of the form fields and their functionalities based on the provided images:

Access the Purchase Order form by navigating to Agile Codex >> Purchase Management click on >> Purchase Orders, then finally click on Create Purchase Order to open Purchase Order form.

Purchase Order General Information
  • Supplier Name: The supplier from whom the products are being ordered.
  • Order Date: The date when the purchase order was created.
  • Send Email to Supplier on Confirmation: If checked, an automatic email with purchase order pdf attachment will be sent to the supplier.
  • Sales Id: Automatically, it will be generated from the Sales Order Increment ID when saving this PO after adding products from a Sales order!
  • Currency: The currency in which the purchase order is being processed.
  • Currency Exchange Rate: If supplier price is in different currency, its cost will be re-calculated based on the exchange rate.
  • Comments: Any additional notes or comments added to the purchase order.
Supplier Product for Purchase Order

Selected Product List for a new Purchase Order with the following columns:

  1. Supplier Name: The name of the supplier providing the products for the purchase order.
  2. Supplier SKU: The supplier's stock keeping unit (SKU) for the product being ordered.
  3. Product Name: The name of the product as recognized by your inventory system.
  4. Order Quantity: The quantity of the product you wish to order from the supplier.
  5. Cost per Unit: The price of each unit of the product from the supplier.
  6. Total Cost: The total cost for the quantity of this product in the order (calculated by multiplying order quantity and cost per unit).
  7. Action: Options to modify the quantity or remove the product from the purchase order.
Supplier Product for Purchase Order

Shipping and Payment information for a new Purchase Order:

  1. Shipping Method: Select the shipping method that will be used to deliver the products from the supplier.
  2. Shipping Cost: Enter the cost of shipping for the purchase order.
  3. Estimated Delivery Date: Specify the expected date when the shipment will arrive from the supplier.
  4. Shipping Label: You can upload a shipping label and send as an email attachment.
  5. Shipping Address: Choose the address where the order will be shipped to.
  6. Handling Cost: Enter its handling cost if necessary.
  7. Additional Duties/strong>: Enter the Additional Duties fee if necessary.
Receiving Product for Purchase Order

When you receive products from supplier to your store, you can use its form by clicking on "Receive Items" button. A popup list will be opened to receive products with following fields:

  1. Product Name: The name of the product being ordered.
  2. Product SKU: The stock keeping unit (SKU) for the product, used to track it in inventory.
  3. Order Quantity: The quantity of the product being ordered from the supplier.
  4. Received Quantity: The number of items that have been received from the supplier.
  5. Pending Quantity: The number of items yet to be received, calculated by subtracting the received quantity from the order quantity.
  6. Cost per Unit: The price per unit of the product as agreed with the supplier.
  7. Total Cost: The total cost for the order quantity of this product, calculated by multiplying the order quantity by the cost per unit.
  8. Action: Allows you to modify the received quantity or take actions such as marking items as received.
Invoice for Purchase Order

When you can create multiple invoices by clicking on "Receive Items" button to pay the purchase amount:

  1. Product Name: The name of the product selected for the purchase order.
  2. SKU: The Stock Keeping Unit identifier for the product.
  3. Quantity: The number of units of the product to be ordered.
  4. Unit Price: The price per unit of the product.
  5. Total Price: The total cost for the quantity ordered (calculated as Quantity x Unit Price).
  6. Subtotal: The subtotal amount for all selected products before taxes and shipping.
  7. Discount: Any discount applied to the total order value.
  8. Grand Total: The final total amount including any discounts, taxes, and shipping costs.

SUPPORT

For further assistance, please send your query through the Contact AgileCodex Support page.

Magento 2 project support

Tell us what you want to improve in your Magento store.

Share the issue, feature idea, integration, upgrade, or support need. We will review the scope and suggest a practical next step for your store.