Magento 2 Wholesaler (Dealer) And Manufacturer Discount

Installation

Never do anything directly on a live store. First setup and test on a development domain (i.e. “dev.url.com”).

Make sure that you set your Magento application to the developer mode.

Temporarily disable Magento cache

To avoid any possible issues with the installation we recommend disabling Magento cache before proceeding with the installation and re-enabling it once the install is complete.

  1. Log in to your Magento admin
  2. Go to System > Cache Management
  3. Select “Select All” in the “Mass Actions” drop down
  4. Select “Disable” in the “Actions” drop down and Click Submit
  5. Once the page reloads log out of the admin

Using your favorite FTP client, upload all files and folders to the root folder of your Magento installation

Download Extension Installation Package

  1. Disable Magento Cache run command "php bin/magento cache:disable" using SSH from your magento root directory.
  2. Upload contents of the extension installation package to your
    "app/code/Acx/Backend",
    "app/code/Acx/Catalog",
    "app/code/Acx/Customeractivation",
    "app/code/Acx/HidePrice",
    "app/code/Acx/LoginCatalog",
    "app/code/Acx/Manufacturer",
    "app/code/Acx/Wholesale" and "dealers" folders in Magento root directory.
  3. Run the following command:
  4.   php bin/magento module:enable Acx_Backend --clear-static-content.
  5.   php bin/magento module:enable Acx_Wholesale --clear-static-content.
  6.   php bin/magento module:enable Acx_Catalog --clear-static-content.
  7.   php bin/magento module:enable Acx_Customeractivation --clear-static-content.
  8.   php bin/magento module:enable Acx_Manufacturer --clear-static-content.
  9.   php bin/magento module:enable Acx_LoginCatalog --clear-static-content.
  10.   php bin/magento module:enable Acx_HidePrice --clear-static-content.

Then run commands"php bin/magento setup:upgrade"using SSH from your magento root directory.

Enable Magento Cache run command "php bin/magento cache:enable"using SSH from your magento root directory.

That’s it! You are good to go with Magento 2 Wholesaler (Dealer) And Manufacturer Discount Extension!
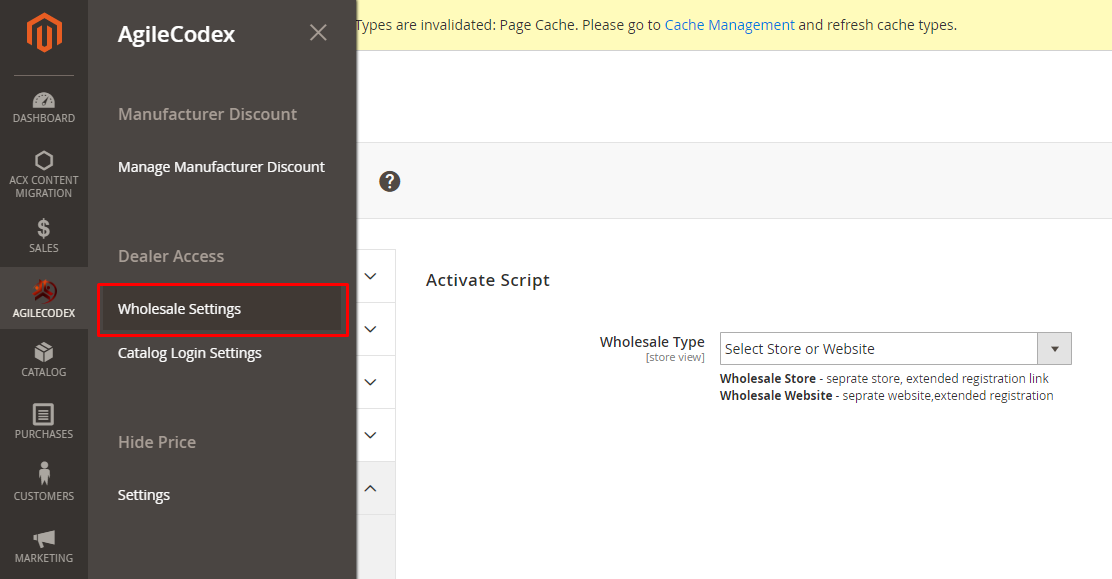
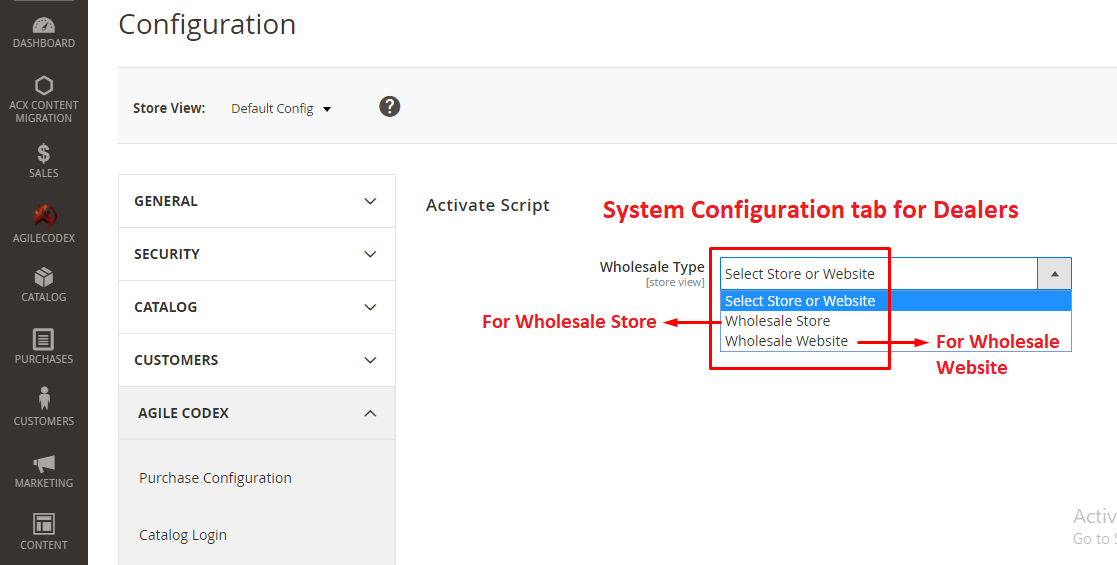
Backend Configuration

Magento 2 Wholesaler (Dealer) And Manufacturer Discount

About Wholesaler (Dealer) Dashboard

1. Creating Wholesaler (Dealer) Website :

Go to Dashboard -> Agilecodex -> Wholesale Setting from admin panel.


Go to -> Wholesale Type from admin panel. (Default Config).


General Options :

  • Select Wholesale (Dealer) Website - You can select for create wholesale website / select existing wholesale website.
  • Wholesale (Dealer) Website - You can select multiple website for wholesale.
  • Create Now! button - You can create website for wholesale.
  • Wholesale (Dealer) Store - You can select multiple store for wholesale.
  • Show Address Fields in Registration Form? - Show address field for wholesale registration.
  • Customer Activation - Customer who registered from the wholesale registration form require activation by admin.
  • Hide Price/Catalog - Require login to see product price/catalog.
  • Show Tax/VAT Number in Registration Form? - Select value for Show Tax/VAT Number field in wholesale registration form.
  • Wholesale (Dealer) Customer Group - Assign customer group for wholesale customers.

2. Wholesaler (Dealer) Website And Store Using Extension :


Go to -> Stores-> All Stores from admin panel.


  • Create Website:To create a new Store Website, Click on the Create Website button and fill up some text field by giving the website's name, code and sort order information.
  • Create Store:To create a new Store, Click on the Create Store button and fill up some text field by giving the Store's name, code information and also you have to select web site and their Root category from the dropdown selection.
  • Create Store View:To create a new Store View, Click on the Create Store View button and fill up some text field by giving the store's name, code and sort order information and also you have to select Store and Status from the dropdown selection.

3. Manage Manufacturer Discount :


  • The Manufacturer Discount menu is located under the main menu of Agile Codex. Here, you have to click on the Manage Manufacturer Discount menu option.

4.List of Manufacturer and their discounts :


  • After then you can see the following window.Here you can see a list of all Manufacturers and their discount amount.

5. Adding New Manufacturer And Their Discount :

  • If you want to add a New Manufacturer discount amount then Click Add New Manufacturer button. After clicking that you will show following window then Select Manufacturer Name, set discount amount and insert created date, Hit the Save Button.

6. Catalog Configuration For Wholesaler (Dealer) Website :

General Options :

  • Enabled Extension - You can Enable/Disable module.
  • Hide Category Navigation - Hide navigation for guest.
  • Redirect to login from any page - Redirect to login page from any page for guest.
  • Do redirect on catalog search pages - If customer is not logged in then redirect to selected page from catalog search pages.
  • Do redirect on product view pages - If customer is not logged in then redirect to selected page from product view pages.
  • Do redirect on category pages - If customer is not logged in then redirect to selected page from category pages.
  • Message when a customer is redirected - When customer is redirected than shows this message.

7. Customer Activation For Wholesaler (Dealer) Website :


Go to Dashboard -> Store -> Customer Activation from admin panel.


General Options :

  • Enabled - You can Enable/Disable module.
  • Customer Options :

  • Activate New Customer Accounts By Default - You can set from here new customer is activated by default or not.
  • Customer GroupWise Activation - You can use for specific customer group wise activation.
  • Require Activation For Group - you can select from here which customer needs activation from admin.
  • Customer Email Options :

  • Notify Customer Of Account Activation - You can set notify customer for account activation or not.
  • Email Sender - You can select email sender.
  • Customer Notification Email Template - Email Template for customer activation.
  • Admin Options :

  • Notify Admin On Customer Registration - You can set notify admin for customer registration or not.
  • Admin Notification Email Template - Email Template for admin notification.
  • Admin Recipients Email Addresses - Add Admin Recipients.
  • Message Options :

  • Error Message - Display Error Message.
  • Registration success Message - Display Message on customer registration success.

8. Wholesaler (Dealer) Customer Need Activation From Admin After Registration :

  • Wholesaler (dealer) customer need activation from admin after registration. You can also set customer activation for other customer group.

9. Enabling Hide Price For Product According Customer Group :


General Options

  • Enabled - You can Enable/Disable module.
  • Display Text - This text will show in place of price.
  • Link Url - Display text redirect to this url.
  • Hide By Customer Group - You can hide price by customer group.

10. New Wholesaler (Dealer) Customer Registration Form :

11. Without Login Clicking Wholesalers (Dealers) Website Catalog Redirect To Login Page :


General Options

  • Customer have to login to see catalog. You can set hide catalog customer group wise also.

12. Configure Price Scope :

The 4-step process will starts by approaching to Admin sidebar on the screen.

1. a) Access to Configuration box
  • On Admin sidebar, click Stores
  • Select Settings
  • Select Configuration
1.b) Select Catalog
  • On the under left of the Configuration box, click Catalog Select Catalog
1.c) Set Catalog Price Scope on the under left
  • Click Price
  • Select one of two options
  • Global
  • Website
1.d) Completing Configuration
  • Click Save Config
THINGS TO REMEMBER
  • There are 3 definitions that need to understand in Configure Price Scope: base currency, allow currency and default display currency.
  • Different impacts can affect the price of products such as the additional costs which makes same products have different prices.

13. Product Price In Retailers Website :


  • Above picture represents the product of Retailers Website. When Adding this Product we Select Manufacturer Name XYZ, Product MSRP 1000, and Price 800.

14. Product Price In Wholesaler (Dealer) Website :


  • Following picture represents the same product in Wholesaler (Dealer) Website. According to requirements here we implements the calculation. Product MSRP = 1000, XYZ Manufacturer discount Amount 27%. So after calculating Price is 730. In Retailers website it is 800.

Thank You

Thank you for reading this user manual! We'd be glad to help you if you have any question relating to this extension.